一、前言
项目实施过程中,需要根据不同的业务场景需求变换地图样式。如果客户提供的底图服务或自建底图服务是类似Mapbox这种矢量切片,那只要按照需求配置不同的样式文件即可。如果没有矢量切片,只有一张张瓦片图如何实现呢?下面提供两种实现方式,以供参考
二、准备工作
首先要将完成地图的初始化
添加地图DIV
1
2
3
4<div class="app-container">
<div id="map" ref="mapEl" class="map">
</div>
</div>
初始化地图
1
2
3
4
5
6
7
8
9
10
11
12
13
14
15
16
17
18
19
20
21
22
23
24
25
26
27
28
29
30
31
32
33
34
35
36
37
38
//底图服务
let tdt_vec = new TileLayer({
source: new XYZ({
crossOrigin:'anonymous',
url: "http://t{0-7}.tianditu.com/DataServer?T=vec_w&x={x}&y={y}&l={z}&tk=" + this.mapKey,
})
})
// 注记服务
let tdt_cva = new TileLayer({
source: new XYZ({
crossOrigin:'anonymous',
url: "http://t{0-7}.tianditu.com/DataServer?T=cva_w&x={x}&y={y}&l={z}&tk=" + this.mapKey,
})
})
this.map = new Map({
target: 'map',
view: new View({
projection: 'EPSG:4326',
center: [103.23, 35.33],
zoom: 12,
maxZoom: 18
}),
layers: [tdt_vec,tdt_cva]
})
let vlayer = new VectorLayer({
source: new VectorSource({
features: [new Feature({
geometry: new Point([103.23, 35.33]),
})]
}),
style: [new Style({
image: new Icon({
src: 'https://openlayers.org/en/latest/examples/data/icon.png',
crossOrigin: 'anonymous',
})
})]
})
this.map.addLayer(vlayer)
三、实现方式
第一种滤镜方式:通过绑定瓦片图层的
className实现- 先添加一个
CSS的滤镜样式
1
2
3
4
/*在CSS里添加滤镜代码*/
::v-deep .filter-class {
filter: grayscale(98%) invert(100%) sepia(20%) hue-rotate(180deg) saturate(1600%) brightness(80%) contrast(90%);
}- 先添加一个
对上面的底图追加
className1
2
3
4
5
6
7
8
9
10
11
12
13
14
15
16//底图服务
let tdt_vec = new TileLayer({
className:'filter-class', // 添加配置的样式Class
source: new XYZ({
crossOrigin:'anonymous',
url: "http://t{0-7}.tianditu.com/DataServer?T=vec_w&x={x}&y={y}&l={z}&tk=" + this.mapKey,
})
})
// 注记服务
let tdt_cva = new TileLayer({
className:'filter-class',// 添加配置的样式Class
source: new XYZ({
crossOrigin:'anonymous',
url: "http://t{0-7}.tianditu.com/DataServer?T=cva_w&x={x}&y={y}&l={z}&tk=" + this.mapKey,
})
})
第二种滤镜方式:通过
tileLoadFunction直接将原始瓦片图替换成加了滤镜的瓦片图1
2
3
4
5
6
7
8
9
10
11
12
13
14
15
16
17
18
19
20
21
22
23
24
25
26
27
28
29
30
31
32
33
34
35
36
37
38
39//底图服务
let tdt_vec = new TileLayer({
source: new XYZ({
crossOrigin:'anonymous',
url: "http://t{0-7}.tianditu.com/DataServer?T=vec_w&x={x}&y={y}&l={z}&tk=" + this.mapKey,
tileLoadFunction:this.tileLoadFunction
})
})
// 注记服务
let tdt_cva = new TileLayer({
source: new XYZ({
crossOrigin:'anonymous',
url: "http://t{0-7}.tianditu.com/DataServer?T=cva_w&x={x}&y={y}&l={z}&tk=" + this.mapKey,
tileLoadFunction:this.tileLoadFunction
})
})
function tileLoadFunction (imageTile, src) {
//第2种方式
// 获取原始瓦片图片信息
let img = new Image()
img.setAttribute('crossOrigin','anonymous')
img.onload = function () {
// 设置canvas画布将图片信息绘制上去
let canvas = document.createElement('canvas')
let ctx = canvas.getContext('2d')
let w = img.width
let h = img.height
canvas.width = w
canvas.height = h
// 设置canvas滤镜
ctx.filter = "grayscale(98%) invert(100%) sepia(20%) hue-rotate(180deg) saturate(1600%) brightness(80%) contrast(90%)"
ctx.drawImage(img, 0, 0)
// canvas绘制的图像替换原有图片信息
imageTile.getImage().src = canvas.toDataURL('image/png');
}
img.src = src
}
四、总结
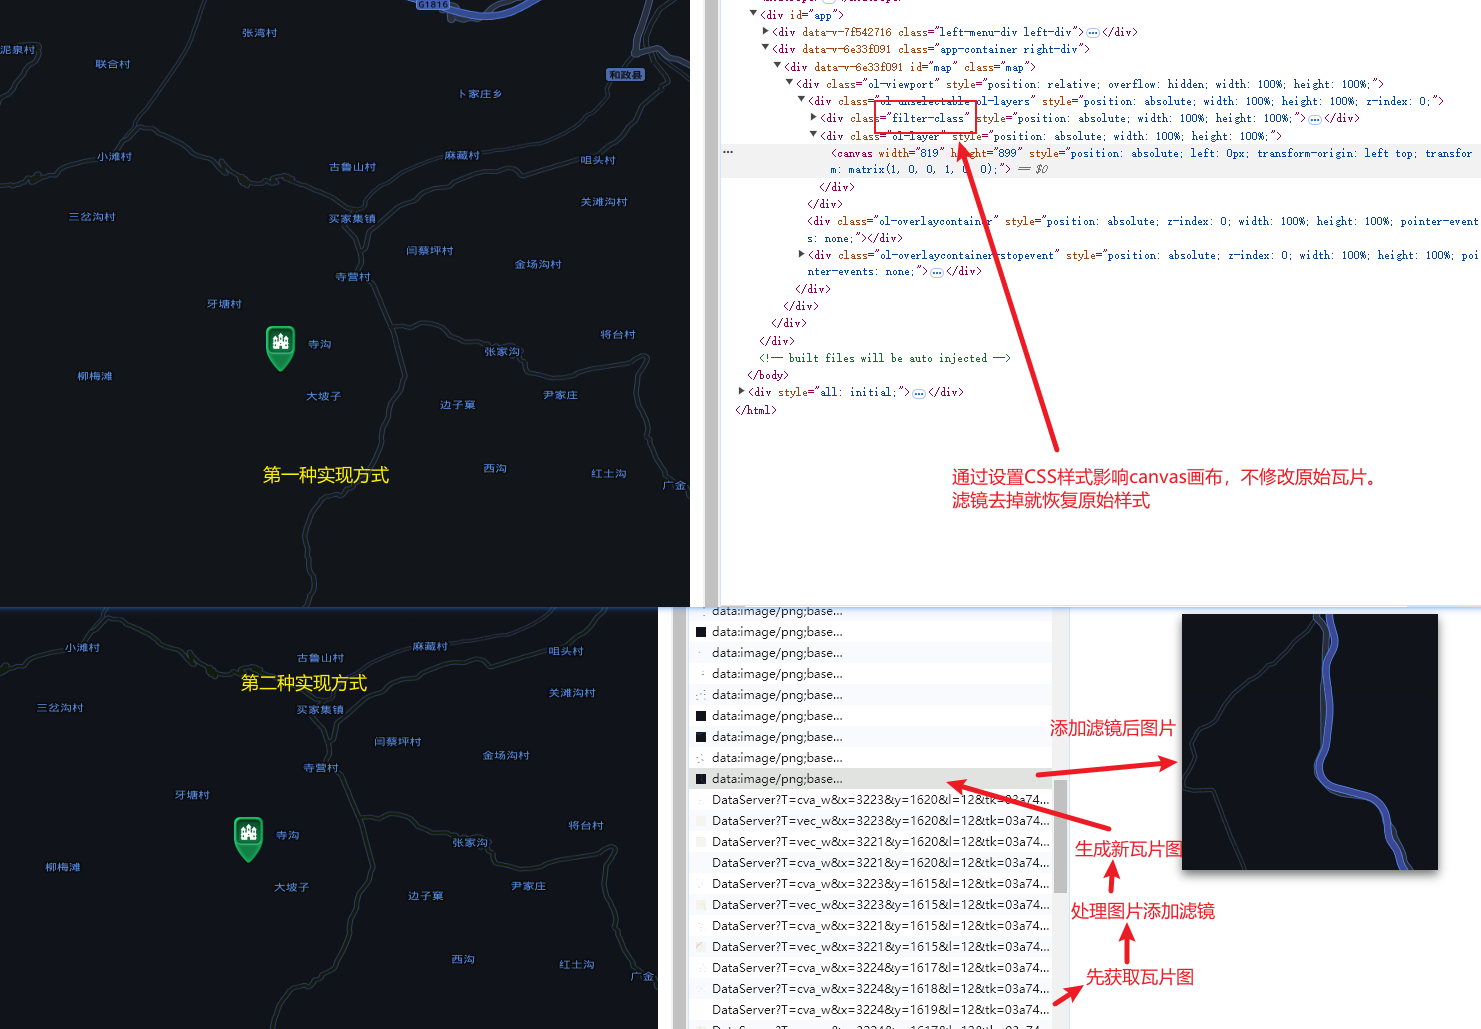
上述两种方式都可以实现改变底图颜色的需求,但实现的逻辑有所区别。className是在canvas节点添加了滤镜,作用到载入画布的所有图像,不作用于原始瓦片。tileLoadFunction则是将请求的原始瓦片用滤镜预处理一遍产生一张加了滤镜的新瓦片,然后再加到canvas中的。将两种实现方式的地图导出就能看到差异了。
完整代码参见:GitHub